
How to connect Telegram to Kommo: bot and personal account in AnyLinga
To connect Telegram to Kommo through AnyLinga, choose a source: a Telegram bot or an employee's personal account. Set up the connection on the Channels page.
Below are the steps for connecting a bot, groups, and a personal account, plus the settings that determine where chats and leads go in Kommo.
What you'll need
- Access to AnyLinga and your Kommo account.
- To connect a bot: a token from @BotFather.
- To connect groups: permission to add the bot to a group and grant it admin rights.
- For a personal account: Telegram Premium for the account owner and access to Telegram on their phone. The connection works through Telegram Business.
Which to choose: a bot or a personal account
A bot works for customer inquiries where customers start the conversation: a bot cannot message first. You can also connect Telegram groups through a connected bot.
A personal account connects through Telegram Business using an assistant bot. You do not need to enter a phone number or login code in AnyLinga. This option works only with private chats, not groups; reactions in Business chats are not supported.
1. Open the channel list
- Go to Channels and open the Direct tab.
- Find Telegram bot or Telegram personal account under Incoming Message Sources.
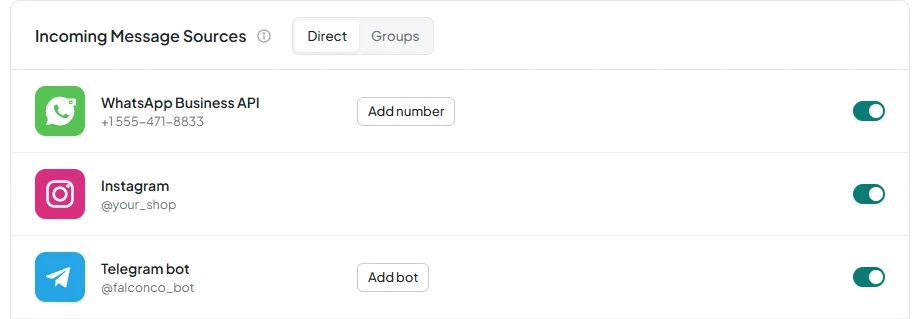
How to connect a Telegram bot
2. Create a bot in Telegram
- Open @BotFather in Telegram and create a bot.
- Copy the token provided.
3. Connect the bot in AnyLinga
- On the Channels page, turn on the toggle in the Telegram bot row.
- Paste the token into the Bot token field. Example format: 123456:ABC-DEF...
- Click Connect. To exit without connecting, click Cancel.
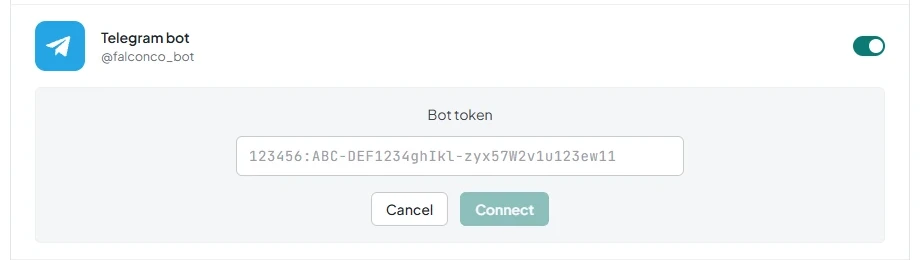
4. Set up multiple bots if needed
- To connect another bot, click Add bot.
- To choose the default bot, click Make default.
- To disconnect, turn off the toggle and click Disconnect.
How to connect Telegram groups
5. Add the connected bot to a group
- Add the Telegram bot already connected as a source in AnyLinga to the group you want to connect.
- Grant the bot admin rights.
- In @BotFather, open Group Privacy for this bot and select Turn off.
6. Enable the group in AnyLinga
- On the Channels page, open the Groups tab.
- Under Telegram Groups, find the group you added. A new group appears with its toggle off. Turn it on.
- If you need translation, turn on Enable Telegram group translation.
How to connect a personal Telegram account
7. Get a link for the account owner
- On the Channels page, turn on the toggle in the Telegram personal account row.
- In the Setup link ready window, click Copy and send the link to the person whose account you are connecting. They must open it in Telegram on their phone.
- If you are connecting your own account, use Open link.
- To connect additional accounts, click + Add another.
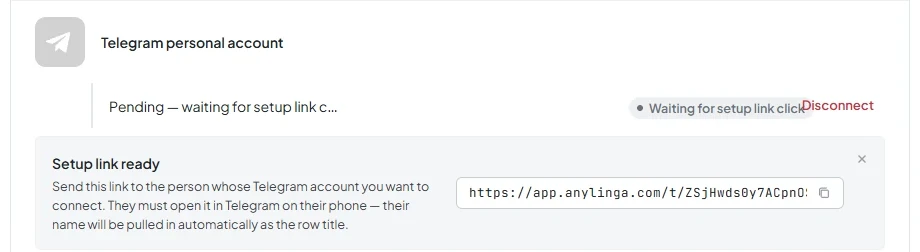
8. Create an assistant bot
- Ask the account owner to follow the link and tap Open in Telegram.
- In Telegram, they need to tap Start, then Create assistant bot.
9. Enable assistant mode in @BotFather
- The account owner must send the /mybots command to @BotFather and select the bot they created.
- Then open Bot Settings → Secretary Mode and select Turn on.
10. Add the bot to Telegram Business
- On the account owner's phone, open Telegram → Settings → Telegram Business → Chatbots.
- First, enable All Chats and Reply to Messages on Your Behalf.
- Then add the assistant bot.
11. Check the statuses and new chat settings
- In your dashboard, track the stages: Waiting for setup link click → Waiting for assistant bot creation → Bot ready — waiting for Business Connection.
- Check the Distribute new chats among managers setting.
- If you need to disconnect the account, turn off the toggle and confirm in the Disconnect personal Telegram? window.
Where chats and leads go in Kommo
Chats arrive in Kommo from the AnyLinga source through the Telegram channel. Kommo creates a lead in Incoming leads. AnyLinga then moves it to the selected pipeline and status and assigns a responsible user according to the rules.
12. Choose a pipeline and status for leads
- Open Processing Rules → Lead Routing.
- In the Pipeline setting, select For all sources or Per source and specify the pipeline.
- Specify the Status to which AnyLinga should move leads.
13. Set up responsible user assignment
- In the Responsible user field, select No assignment, Specific user, Round-robin, or Random.
14. Set up source labels for contacts and leads
- Use Source field on contact for a link in the format t.me/username.
- Set up Tag on contact and Tag on lead.
- Use the Telegram and Personal Telegram tags to identify the source.
Get in touch
We reply during business hours.
Already using AnyLinga?
Describe your question and we'll reply on WhatsApp or by email.
New to AnyLinga?
Try it yourself, or we'll set it up for you when you pay for the first month.