
Follow-up WhatsApp messages: automatically reach clients who did not reply to a broadcast
How do you send an automatic follow-up WhatsApp message when a client does not reply to a broadcast? In AnyLinga, you need an automatic segment and a broadcast that sends a message when a contact enters the audience.
Below is how to set up client follow-ups: select the original broadcast, set how long to wait for a reply, and launch a WhatsApp follow-up using an approved template.
What you'll need
- The Campaigns or Workspace plan, or a 7-day trial — plans.
- A WhatsApp Business API number.
- At least one launched broadcast. If you do not have one yet, start with the guide to broadcasting to your own contact list.
- An approved follow-up message template — how to create a template.
How automatic follow-ups work
An automatic segment collects contacts who received the original broadcast but did not reply within a set number of days. A contact stays in the segment while they meet the conditions and leaves automatically when they no longer do — for example, after replying.
For this segment, launch a broadcast with the send time set to When a contact enters the audience. Each new segment member automatically receives a follow-up message using the selected template.
Create an automatic segment
1. Open audience creation
- Go to Broadcasts → Audiences → Create audience.
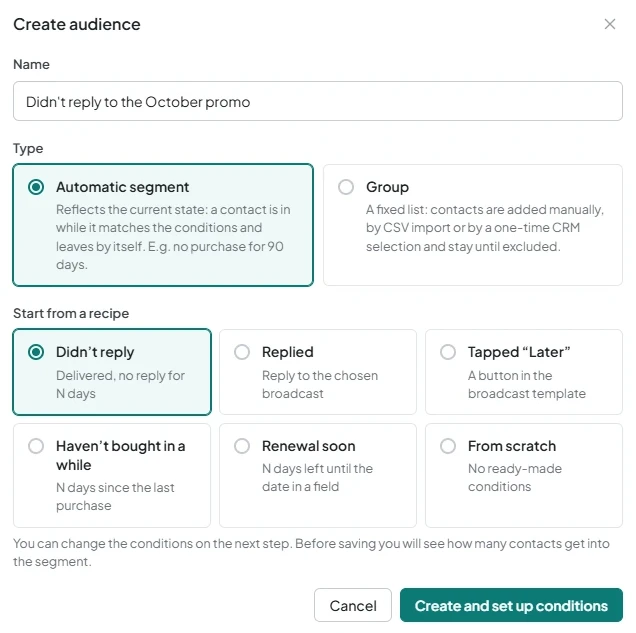
- In the Name field, enter a clear name, such as “Did not reply to the October promotion.”
- In the Type field, select Automatic segment.
2. Choose a recipe for contacts who did not reply
- Under Start from a recipe, select Didn’t reply — the “Delivered, no reply for N days” recipe.
- The recipe combines two conditions using AND: the broadcast was delivered and there has been no reply for 7 days.
- Click Create and set up conditions.
Set up conditions and reply handling
3. Specify the broadcast and waiting period
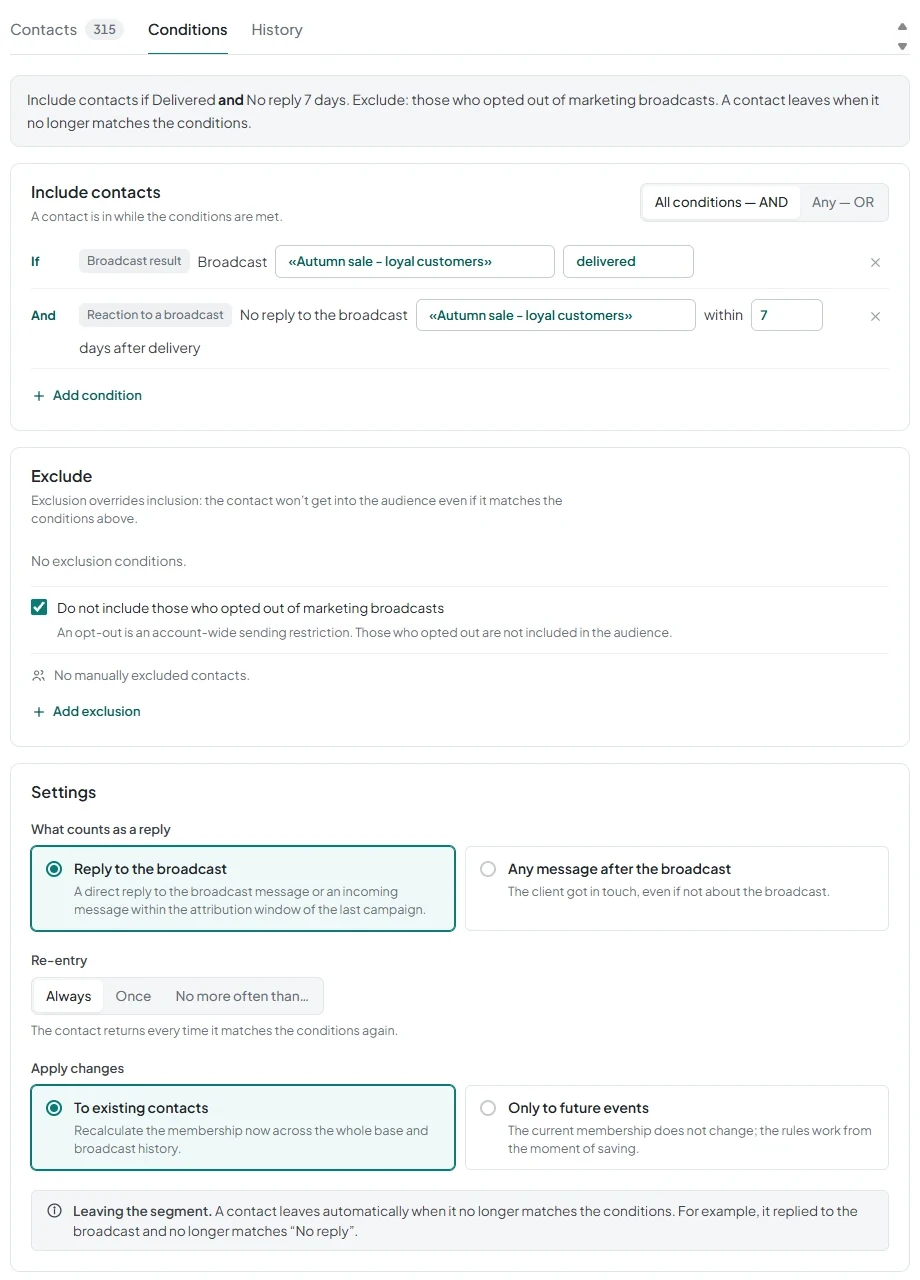
- Open the Conditions tab and the Include contacts block.
- In the No reply to the broadcast condition, select the original broadcast and set the waiting period: within N days after delivery.
- The minimum is 1 day; the default is 7 days. The condition is met only if the message was delivered, N days have passed since delivery, and there has been no reply.
4. Check how conditions are combined and review exclusions
- With two or more conditions, select All conditions — AND to require every condition, or Any — OR if one is enough.
- If needed, use conditions from the Reaction to a broadcast group: Replied to the broadcast or Tapped a button. The latter refers to a quick reply button in the template, such as “Later.”
- The Broadcast result group includes Broadcast conditions with the statuses sent, delivered, read, and not delivered.
- Check the Exclude block. The Do not include those who opted out of marketing broadcasts checkbox is selected by default.
5. Set reply and re-entry settings
- In the Settings card, find What counts as a reply. The default is Reply to the broadcast: a direct reply or an incoming message within the attribution window. The alternative is Any message after the broadcast.
- In the Re-entry field, select Always, the default, Once, or Do not send more often than once every N days.
- In the Apply changes field, leave To existing contacts selected to recalculate the entire contact list and broadcast history immediately. Or select Only to future events.
6. Check the result and save the rules
- In the Preview panel, check Will be added: {{n}} and Sample contacts.
- Click Save rules.
- To recalculate manually, open More → Recalculate now.
- If needed, use Pause rules, then Resume rules.
Launch a follow-up message when a contact enters the segment
7. Create a broadcast for the segment
- On the segment card, click Create broadcast. Another path is Campaigns → Create broadcast.
- Select an approved follow-up message template.
- In the Audience section, select Audience mode and the segment you created.
8. Enable sending when a contact enters the audience
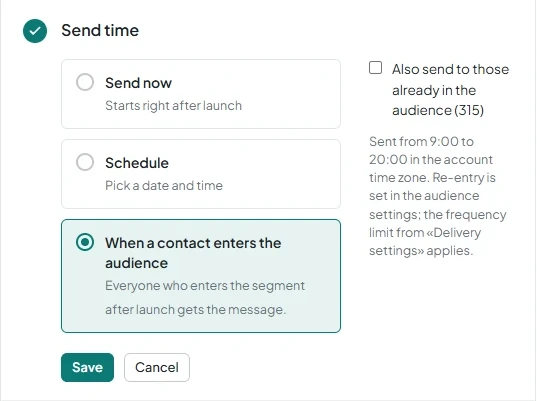
- In the Send time section, select When a contact enters the audience. Everyone who enters the segment after launch will receive the message.
- To also send the message to current segment members, enable Also send to those already in the audience ({{n}}).
- Check Delivery settings: the suppression list and the Do not send more often than limit also apply to this broadcast.
9. Launch the campaign
- Click Launch.
- To stop the broadcast, use Cancel campaign.
- To pause segment processing, click Pause rules in its settings — this also pauses the campaign.
Check the follow-up broadcast results
10. Open the campaign report
- Check Delivered, Replied, Opted out, and Cost — the report has the same layout as a regular broadcast report.
- When estimating costs, include follow-up messages: Meta charges for each template message. Use the calculator to estimate costs.
Get in touch
We reply during business hours.
Already using AnyLinga?
Describe your question and we'll reply on WhatsApp or by email.
New to AnyLinga?
Try it yourself, or we'll set it up for you when you pay for the first month.