
WhatsApp Opt In: Collect Consent and Set Up Opt-Outs in AnyLinga
Before sending a WhatsApp broadcast, you need to collect WhatsApp opt-in consent from recipients and provide a way to opt out of messages.
AnyLinga does not provide tools for collecting consent, such as signup forms or keyword subscriptions. You collect consent yourself, then confirm it in AnyLinga. For opt-outs, you can assign a template button or manually add a number to the stop list.
What you'll need
- Recipient consent collected through a website form, a contract, or in a store.
- Contacts to add to AnyLinga or a CSV file to import.
- A template with a quick reply button, such as “Stop,” if you need button-based opt-outs.
- Numbers in international format with the country code to add to the stop list manually.
What consent and opt-out rules apply
Get the person's consent before sending WhatsApp messages. The consent must clearly state that the person agrees to receive messages from your company and identify the business. Under Meta's rules, consent can be general, not specific to WhatsApp. You must also comply with local laws. Learn more: Meta's opt-in documentation.
You must honor all requests to stop messages or opt out, whether they arrive through WhatsApp or another channel. Source: WhatsApp Business policy.
Meta also limits the number of marketing templates a person can receive. Meta sets this limit for each recipient and does not publish its numerical value. Source: Meta's documentation.
How to collect and confirm consent
1. Collect consent outside AnyLinga
- Use a website form, a contract, or in-store consent.
- Include the business name and clearly state that the person agrees to receive messages from it.
2. Confirm consent when adding contacts
- Open CSV import or Add contacts.
- Select the required checkbox: I confirm that everyone in this file has agreed to receive WhatsApp messages from us. Messaging without consent leads to reports and a blocked number.
How to set up button-based opt-outs
3. Add a quick reply button to the template
- Add a quick reply button to the template, such as “Stop.”
- For setup instructions, see how to create a template.
4. Assign the broadcast's opt-out button
- In the broadcast wizard, open the Message section.
- In the Opt-out button field, select the button you prepared.
- If you are not assigning a button, select No opt-out button.
5. Handle opt-out requests sent as text
- If a customer sends “stop” as a text message, manually add their number to the stop list.
- Handle opt-out requests received outside WhatsApp the same way.
How to manage the stop list
6. Open the stop list and add a number
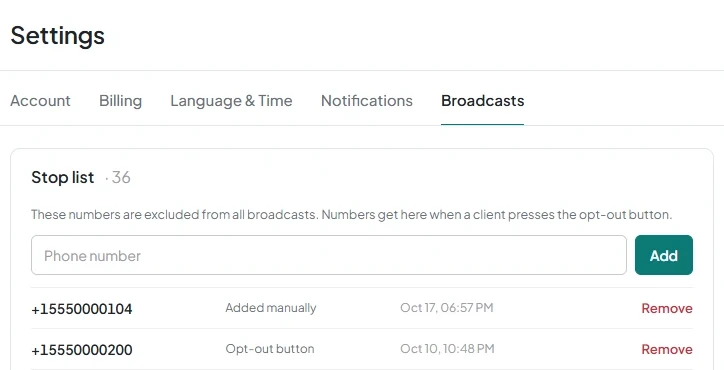
- Go to Settings → Broadcasts → Stop list.
- Enter the number in international format with the country code in the Phone number field and click Add.
- Check the entry's source: Opt-out button or Added manually.
- To remove an entry, use Delete.
7. Record an opt-out directly from the audience
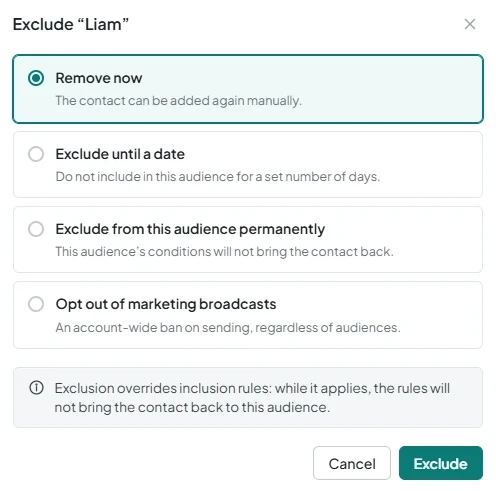
- In the audience, open Exclude.
- For a marketing opt-out, select Opted out of marketing broadcasts and click Ban broadcasts. The number will be added to the stop list.
- For other tasks, use Remove now, Exclude until a date, or Exclude from this audience permanently.
8. Check that opted-out recipients are excluded
- In automatic segments, check the Do not include those who opted out of marketing broadcasts checkbox. It is selected by default.
- During audience validation, opted-out numbers are given the reason Opted out.
- In the report, check the Opted out metric.
How to limit broadcast frequency
9. Set the interval between broadcasts
- Open Delivery settings → Do not send more often than.
- Choose to send no more than once every 1, 3, 7, 14, or 30 days. The default interval is 7 days.
- If you do not need a limit, select No limit.
Get in touch
We reply during business hours.
Already using AnyLinga?
Describe your question and we'll reply on WhatsApp or by email.
New to AnyLinga?
Try it yourself, or we'll set it up for you when you pay for the first month.